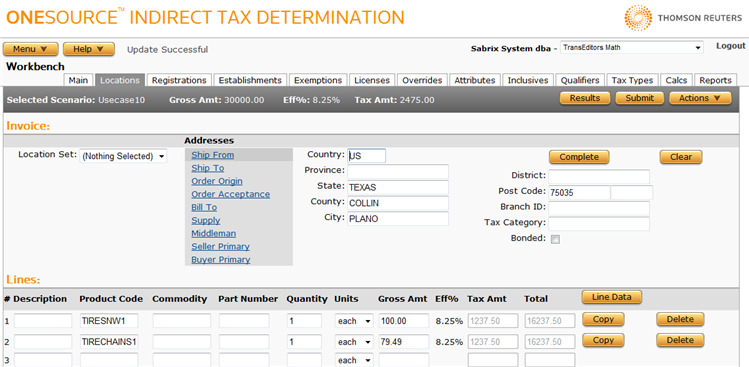
Workbench Locations
Menu > Workbench > Locations
A variety of locations can be involved in a transaction. These impact where and how the transaction is taxed. Use this page to specify location sets or individual locations for the entire invoice or its individual lines. Locations set at the line level always override those found at the invoice level.

Click a link to go to a procedure. In the following procedures, use the Locations field reference below to enter data in required and optional fields. On this page, you can:
|
Locations Field Reference |
|
|---|---|
| Location | Description |
|
Ship From |
The address from which goods are being shipped. |
|
Ship To |
The address to which goods are being shipped. |
|
Order Origin |
The address from which the order originated. |
|
Order Acceptance |
The address at which the order was accepted. |
|
Bill To |
The bill to address for the buyer. |
|
Supply |
The supply address. Most services in the vast majority of countries rely on the supply country as a central address in determining VAT liability. In addition, this address is used in determining Prime Contracting and Default Services transaction taxes in the US. |
|
Middleman |
The middleman's location. If a middleman is involved, use this field. |
|
Seller Primary |
The seller's country. This is often used in Europe. |
|
Buyer Primary |
The buyer's country. This is often used in Europe and is a synonym for the Sold To address. |
|
Address Fields |
Enter the detailed address information in these fields.
|
|
Branch ID |
The branch ID of a company, passed with registration numbers for VAT Returns in several countries. For example, in the UK, companies must file their VAT Returns with Branch ID information included. |
|
Location Tax Category |
An optional tax category for this location. Tax categories are user-defined classifications of locations that can be used as Rule Qualifiers. |
|
Is Bonded |
Indicates whether or not this location is a bonded facility such as a bonded warehouse. |
The Line area on the Locations page shows the current line being edited, including a description of basic line information.
- Select a line number from the Line menu to change lines.
- Click the Line Data button to configure locations for the selected line.
- Follow instructions in the procedure below for the configuration you want to make.
You can click the Line Items button to toggle back to basic line information.
- Select the appropriate address type from the Address Selector in either the Invoice or Line area.
- Enter the desired data.
- For US addresses, you can choose to complete data by clicking the Complete button. See below.
- Click Submit to save this location data.
- Select US as the Country.
- Enter a ZIP Code (Post Code), State, County, or City, or a combination of these address elements.
- Click the Complete button.
- One of the following occurs:
- If a single address, including ZIP code, matches the address information given, the address is completed and you return to the Locations page.
- If more than one address is valid, you can choose the correct one from the pop-up window to return to the Locations page.
- If more than 250 addresses are valid, a message appears. Refine your search criteria and try again.
Clear address fields for a location type
- Select the location type to clear.
- Click Clear to remove contents of all address fields.
- If you want to override previously defined locations with the location set, clear the location data for those locations first and click Submit. If no locations were previously defined for the scenario, you can skip this step.
- Select the set name from the Location Set menu in either the Invoice or Line area.
- Click Submit.
- Navigate to the Actions menu.
- Select XML Input, Allocated XML Input, Filtered XML Input, or XML Output. For more information, see Viewing Workbench XML Data.
You can export the selected scenario, or all scenarios associated with this company.
- Select Properties from the Actions menu.
- Click one of the following:
- This Scenario to export only the selected scenario.
- This Scenario and All Siblings to export the selected scenario and all other scenarios associated with the selected company.
- Click Save.
- Browse to or enter a filename to save to and click Save.
Once you save the file, you can re-import it. See the Importing Data page.
- Click Submit to save your scenario.
- Then click Results in the Selected Scenario section.