Allocations
Menu > Company Data > Allocations
Use this page to manage Allocations. Allocations split individual line items into logical components and increase accuracy of your tax liabilities. Standard transactions do not require allocations processing. For examples of transactions that require allocations and an overall process flow, please review Allocations.
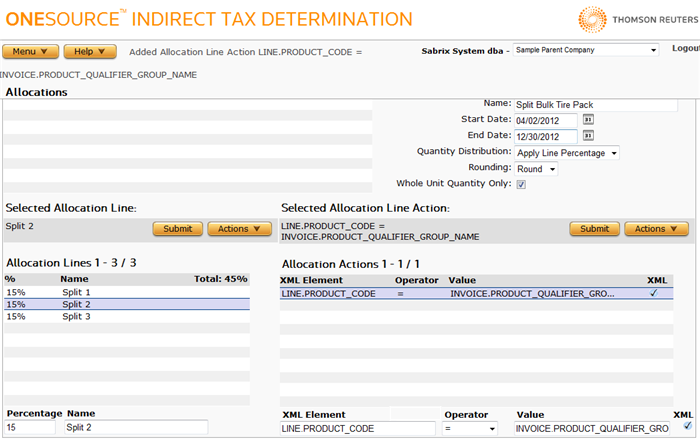
This page has the following areas and their associated tasks:
- Allocation Group Tasks : Select, add, rename, delete, or export allocation group(s).
- Allocations List Tasks: Select or view data about current named allocations in the selected group.
- Allocation Tasks: Add, copy, edit, delete, or export the selected allocation.
- Allocation Line Tasks: Add, copy, modify, or delete individual lines for the selected named allocation line.
Allocation Group Tasks
Allocation groups contain individual named allocations, and help you organize your allocations. Any named allocation can be applied to a transaction if the group name and allocation name associated with the company performing the calculation are passed in with the transaction or set by a TransEditor.
The default Allocation Group for the selected company is set on that company's Company Logic Preferences page.
Select an Allocation Group
- Click the arrow on the Allocation Group menu.
- Choose the desired group. Information about the group populates the Allocations List.
Add an Allocation Group
- Select Add from the Actions menu.
- Enter the name of the group in the Allocation Group box.
- Click OK.
Rename an Allocation Group
- Select the group from the Allocation Groups selector.
- Select Rename from the Actions menu.
- Enter the new name for the group.
- Click OK.
Delete an Allocation Group
- Select the group from the Allocation Groups selector.
- Select Delete from the Actions menu.
- Click OK to confirm the deletion.
Export an Allocation Group
You can export the selected allocation group, or all allocation groups owned by the selected company.
- Select the desired group from the Allocation Groups list.
- Select Properties from the Allocation Group Actions menu.
- Click one of the following.
- This Allocation Group to export only the selected group, including all allocations belonging to that group.
- This Allocation Group and All Siblings to export all groups owned by the selected company, including all allocations belonging to those groups.
- For either type, all allocations associated with the exported group are also exported.
- Click OK.
- Browse to or enter a filename and click Save.
Once you save the file, you can re-import it. See the Importing Data page.
Allocations List Tasks
The Allocations List is populated by the allocations in the selected Allocation Group.
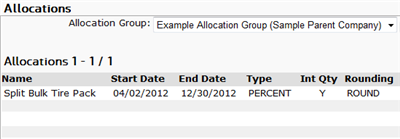
If you select an allocation from the list, the Selected Allocation section is populated with the data related to that allocation. See the following Allocations List Field Reference for information about the data.
|
Allocations List Field Reference |
|
|---|---|
|
Field |
Description |
|
Name |
The name of the allocation. |
|
Start Date |
The effective start date for this allocation. A single allocation name cannot use overlapping date ranges. You may, however, create multiple allocations using the same name with differing date ranges. |
|
End Date |
The effective end date for this allocation. When left blank, the allocation will not expire. |
|
Type |
Copy or Percent:
|
|
Int Qty |
One of the following:
|
|
Rounding |
One of the following (only if Int Qty = Y):
|
Allocation Tasks
Use this section to create a new allocation, or modify or delete a selected allocation. Use the Selected Allocation Field Reference table below to enter required and optional values.
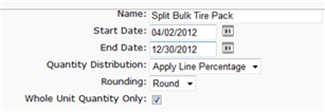
Add a new allocation
- Select Add from the Actions menu.
- Enter data using the field reference below.
- Click Submit to save your changes.
Copy an allocation and its child lines and actions
- Select the desired allocation from the Allocations List.
- Select Copy from the Actions menu.
- Enter a new name for the allocation and click OK.
- Enter data using the field reference below.
Modify an allocation
- Select the allocation from the Allocations List.
- Modify data using the field reference below.
Delete an allocation
- Select the allocation from the Allocations List.
- Select Delete from the Actions menu.
- Click OK to confirm the deletion.
Export the Selected Allocation, or All Allocations in the Selected Group
- Select Properties from the Actions menu.
- Click one of the following.
- This Allocation to export only the selected allocation.
- This Allocation and All Siblings to export all allocations in the selected allocation.
- Click Save.
- Browse to or enter a filename to save to and click Save.
Once you save the file, you can re-import it. See the Importing Data page.
|
Selected Allocation Field Reference |
||
|---|---|---|
|
Field |
Req? |
Description |
|
Name |
Y |
The name of the allocation. |
|
Start Date |
Y |
The effective start date for this allocation. A single allocation name cannot use overlapping date ranges. You may, however, create multiple allocations using the same name with differing date ranges. |
|
End Date |
Opt. |
The effective end date for this allocation. When left blank, the allocation will not expire. |
|
Quantity Distribution |
Y |
Select one of the following:
|
|
Rounding |
Opt. |
Select one of the following if Whole Integer Quantity is checked:
|
|
Whole Unit Quantity Only |
Opt. |
Indicate one of the following:
|
Allocation Line Tasks
Allocation Lines are associated with the selected allocation. Each line also has one or more associated actions. Use the Allocation Line Field Reference table below to enter required and optional data.
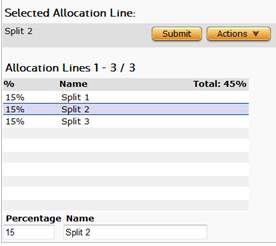
Add a new allocation line
- Select Add from the Actions menu. If this is the first line configured, you can skip this step.
- Enter data using the field reference below.
- Click Submit to save your changes.
Copy an allocation line and its actions
- Select the desired allocation line from the Allocations Lines list.
- Select Copy from the Actions menu.
- Enter a new name for the allocation line and click OK.
- Enter data using the field reference below.
- Click Submit to save your changes.
Modify an allocation line
- Select the allocation line from the list.
- Modify data using the field reference below.
- Click Submit to save your changes.
Delete an allocation line
- Select the allocation line from the list.
- Select Delete from the Actions menu.
- Click OK to confirm the deletion.
|
Allocation Line Field Reference |
||
|---|---|---|
|
Field |
Req? |
Description |
|
Percent |
Opt. |
A percentage to associate with the line.
|
|
Name |
Y |
A name for this allocation line. This name is for your organizational convenience and is not stored in audit or used in calculations. |
|
Total (in List Header) |
NA |
Provides a running total of percentages of all lines in this allocation. |
Allocation Line Actions Tasks
Allocation Line Actions are associated with the selected Allocation Line. Each line can have one or more actions.
Use the Allocation Line Actions Field Reference below to enter data for required and optional fields.
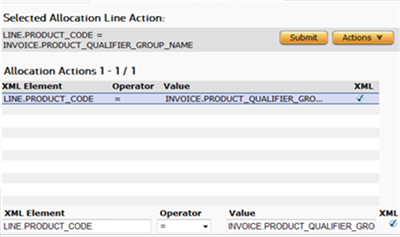
Add a new action
- Select the desired line from the Allocation Line List.
- Perform one of the following actions:
- If this is the first action, enter data using the field reference below and click Submit.
- If this is not the first action, select Add from the Actions menu, enter data using the field reference below, and click Submit.
Modify an action
- Select the action from the list.
- Modify data using the field reference below.
- Click Submit to save your changes.
Move one or more actions in the list
- Select the action from the list. To move multiple contiguous actions, ensure that the first (top) action you want to move is selected.
- Select Move Up or Move Down from the Actions menu.
- Enter a number of positions to move the selected action(s) up or down and click OK.
- Enter a number of actions to move. If the selected action is the only action to move, accept the default of 1.
- Click OK.
Delete an action
- Select the action from the list.
- Select Delete from the Actions menu.
- Click OK to confirm the deletion.
|
Allocation Line Actions Field Reference |
||
|---|---|---|
|
Field |
Req? |
Description |
|
XML Element |
Y |
The input XML Element for which you want to set a new value. Element names either have no prefix (batch-level) or are prefixed with INVOICE. or LINE. for invoice- and line-level elements, respectively. Enter several characters of an element to open a list of up to 10 matching elements. Continue entering characters until you see the desired element name, and then select it. You cannot modify TransEditor or Allocation elements from within an allocation because both types of elements have already been processed before the allocation is run. |
|
Operator |
Y |
One of the following:
Use *, -, +, and / only where the XML Element type is a number (for example, <MASS>, <QUANTITY>, or a custom attribute containing a number. Otherwise, the action will fail and an error message will be returned. |
|
Value |
Y |
The value to set for the element (using = operator) or the value to use in arithmetic calculations (all other operators). This value can be a constant, or the value of an XML Element. See the description of that field above for more information on entering/selecting element names. |
|
XML |
(N/A) |
When checked, indicates that the value of the XML Element is set to the value of the XML element entered in the Value field. When not checked, indicates that the value of the XML Element is set to a constant entered in the Value field. For more information, see Tax Calculation XML Elements. |