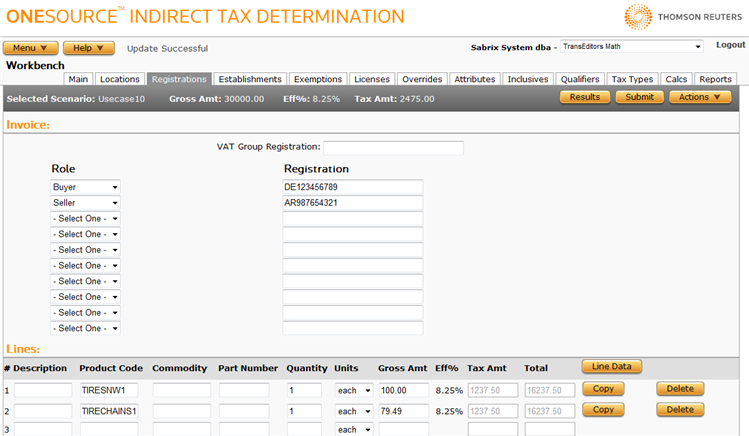
Workbench Registrations
Menu > Workbench > Registrations
Use this page to specify registration numbers for the buyer, middleman, or seller to be used when calculating this transaction. You can enter multiple registrations for each role, including different registrations at the invoice and line levels. If no registrations are entered on this page, the system will use registrations already associated with the relevant authorities in the system.
You can also use this page to specify a VAT Registration Group number to attempt to trigger VAT Group Registrations functionality.
Registration numbers are configured on the Registrations page, using authority-specific Registration Masks.
If this transaction is audited, both the registration numbers used in the calculation and the fiscal representative data associated with the registration(s) are stored in the audit data.
|
Field Reference |
|
|---|---|
|
VAT Group Registration |
A registration number associated with a VAT Group as defined on the VAT Group Registrations page. |
|
Role |
The role to which you want the registration to apply: Buyer, Seller, or Middleman. |
|
Registration |
A valid registration number. An individual registration number can be duplicated at the invoice and line level, but cannot appear twice at the same level. |
Set invoice-level options
- Enter or select the desired values.
- Click Submit to save the options.
Set line-level options
- Click the Line Data button if necessary. This button does not appear if you are already in line configuration mode.
- Select the desired line by choosing a number from the Line menu. If you need to see details about a line, you can toggle back and forth by clicking the Line Items and Line Data buttons.
- Enter or select the desired values.
- Click Submit to save the options.
View XML Data
Select XML Input, Allocated XML Input, Filtered XML Input, or XML Output from the Actions menu. For more information, see Viewing Workbench XML Data.
Export a scenario
You can export the selected scenario, or all scenarios associated with this company
- Select Properties from the Actions menu.
- Click one of the following:
- This Scenario to export only the selected scenario.
- This Scenario and All Siblings to export the selected scenario and all other scenarios associated with the selected company.
- Click Save.
- Browse to or enter a filename to save to and click Save.
Once you save the file, you can re-import it. See the Importing Data page.
View calculation details
- Click Submit to save your scenario.
- Click Results in the Selected Scenario section.